以极路由1S为例,其他平台亦可参照该教程使用。
下面正式开始:
云平台安装插件,启用开发者模式,同时会失去保修,介意请勿继续。
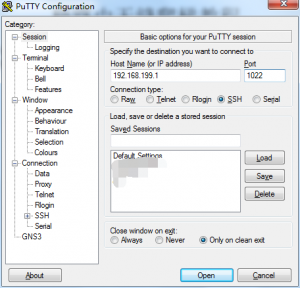
安装开发者模式后会开启ssh,端口为1022 。
- 使用putty 连接后台 用户名root 密码是你web登录的密码。
-
执行命令
opkg update ; opkg install shadowsocks-libev pdnsd
安装Shadowsocks-libev :是需要使用ss-redir 转发请求到ss服务器
Pdnsd 可以把dns请求通过tcp转发到安全dns服务器,防止dns污染。 -
编辑iptables 参数 x.x.x.x 替换为ss服务器地址
mkdir -p /etc/firewall.d/
touch /etc/firewall.d/01-shadowsocks.sh
下面参数修改后保存到/etc/firewall.d/01-shadowsocks.sh
iptables -t nat -N ss-redir-output &>/dev/null
[ $? -ne 0 ] && return
iptables -t nat -A OUTPUT -j ss-redir-output
iptables -t nat -N ssgoabroadng-output
iptables -t nat -A ss-redir-output -j ssgoabroadng-output
iptables -t nat -N ss-redir-pre
iptables -t nat -A PREROUTING -i br-lan -j ss-redir-pre
iptables -t nat -A ss-redir-pre -d x.x.x.x -j RETURN
iptables -t nat -A ss-redir-pre -d x.x.x.x -j RETURN
iptables -t nat -A ss-redir-pre -p tcp -m set --match-set local dst -j RETURN
iptables -t nat -A ss-redir-pre -p tcp -m set --match-set china dst -j RETURN
iptables -t nat -A ss-redir-pre -p tcp -j REDIRECT --to-ports 7070 -m comment --comment local_port_to—ss
- 编辑ss配置文件ss.json 具体参数根据自己ss服务器修改 local_port 是iptables需要转发到的端口
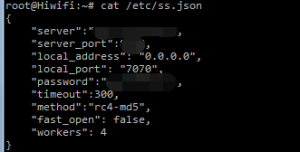
/etc/ss.json
{
  "server" : "ss-ipaddr",
  "server_port" : "ss-port",
  "local_address" : "0.0.0.0",
  "local_port" : "7070",
  "timeout" : "300",
  "method" : "encrypt-type",
  "password" : "ss-password",
  "workers" : "2"
}
- 修改pdnsd.conf 把端口改成7453 与dnsmasq自定义配置文件呼应
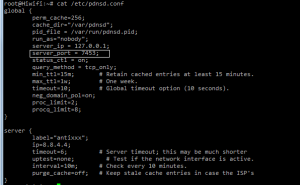
cat /etc/pdnsd.conf
global {
         perm_cache=256;
         cache_dir="/var/pdnsd";
         pid_file = /var/run/pdnsd.pid;
         run_as="nobody";
         server_ip = 127.0.0.1;
         server_port = 7453;
         status_ctl = on;
         query_method = tcp_only;
         min_ttl=15m;       # Retain cached entries at least 15 minutes.
         max_ttl=1w;        # One week.
         timeout=10;        # Global timeout option (10 seconds).
         neg_domain_pol=on;
         proc_limit=2;
         procq_limit=8;
}
server {
         label="antixxx";
         ip=8.8.4.4;
         timeout=6;         # Server timeout; this may be much shorter
         uptest=none;         # Test if the network interface is active.
         interval=10m;      # Check every 10 minutes.
         purge_cache=off;   # Keep stale cache entries in case the ISP's
}
- 建立/etc/dnsmasq.d/ 通过winscp把配置文件传到该目录下

head -n10 /etc/dnsmasq.d/01-pollution.conf
server=/0rz.tw/127.0.0.1#7453
server=/0to255.com/127.0.0.1#7453
server=/1000giri.net/127.0.0.1#7453
server=/10conditionsoflove.com/127.0.0.1#7453
server=/10musume.com/127.0.0.1#7453
server=/123rf.com/127.0.0.1#7453
server=/12bet.com/127.0.0.1#7453
server=/12vpn.com/127.0.0.1#7453
server=/141hongkong.com/127.0.0.1#7453
server=/173ng.com/127.0.0.1#7453
- 修改dnsmasq启动文件 查找conf-dir 把/tmp/dnsmasq.d 改为/etc/dnsmasq.d
sed 's/tmp\/dnsmasq.d/etc\/dnsmasq.d/g'
![]()
查找pdnsd_init 删掉红框内容,改为红框上一行那样。并注释掉HONEST 那一行。

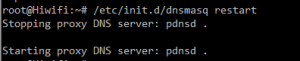
改完之后重启dnsmasq
/etc/init.d/dnsmasq restart
8. 编辑/etc/rc.local把ss-redir pdnsd添加到开机启动。
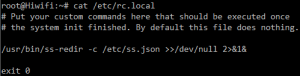
/usr/bin/ss-redir -c /etc/ss.json >>/dev/null 2>&1&
- 执行命令,重启相关服务或者直接重启路由器
/etc/init.d/firewall restart
/usr/sbin/pdnsd -d -c /etc/pdnsd.conf&
/usr/sbin/ss-redir -c /etc/ss.json &
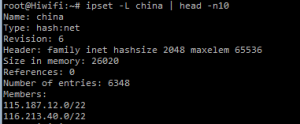
- 检查启动效果
ipset –L china | head –n10
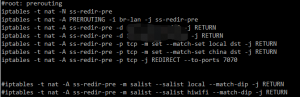
iptables -t nat -nvL ss-redir-pre
![]()
netstat -antup| egrep "7453|7070"

11. 完毕
后注:极路由内部有中国IP列表和本地域名列表,所以不用手动设置ipset。
其他平台看下边
- 查看你路由器dnsmasq是否支持ipset,若没有出现no-ipset 就可以
![]()
- 安装ipset 软件包各系统安装方法可能不一,请自行解决。
ubuntu 直接
apt-get install ipset手动加载命令
    ipset restore </data/config/china.conf
    ipset restore </data/config/local.conf
下边内容添加到/etc/network/interfaces,可开机自动加载
    post-up ipset restore </data/config/china.cnof
    post-up ipset restore </data/config/local.conf
注:例中文件已上传到/data/config/ 可根据自己情况修改。
china.conf
- iptables 内容
    iptables -t nat -A PREROUTING -p tcp -j ss-pre
    iptables -t nat -n ss-pre
    iptables -t nat -A ss-pre -d x.x.x.x -j RETURN
    iptables -t nat -A ss-pre -d x.x.x.x -j RETURN
    iptables -t nat -A ss-pre -p tcp -m set --match-set local dst -j RETURN
    iptables -t nat -A ss-pre -p tcp -m set --match-set china dst -j RETURN
    iptables -t nat -A ss-pre -p tcp -j REDIRECT --to-ports 7070 -m comment --comment local_port_to_ss
- 安装pdnsd修改pdnsd.conf 把端口改成7453 与dnsmasq自定义配置文件呼应。 参考上边
apt-get install pdnsd
- 安装shadowsocks-libev 需要编译,设置ss-redir 参考上边
待续